Monday, August 29

Sunshine Wishes and Honeymoon Dreams

Summer in Santa Cruz is in full force. For those of you who've never visited California's central coast, there's a reason why local souvenir shops sell lots of fleece jackets. Instead of sunshine, blue skies, and warm beach days, we get what Mr. Hot Tea affectionately refers to as the fog monster. Here's a recent photo to reinforce the chill of a 60-degree summer:


{ The wool cap is a necessity, not just a fashion accessory }

The Teacup family vacation is regularly scheduled for late May or early June in hopes to avoid the fog monster for a little while. Unfortunately, W-Day planning and budgeting necessarily took priority over our annual summer sojourn. 

Dudes, we are suffering from cabin fever. First world problems, I know. We live in a place where millions of people visit annually, courtesy of the Beach Boardwalk.


{ Our evening view during a winter sunset }

Just as it is at any other destination, living here isn't the same as coming for a vacation getaway. We have been itching to book our honeymoon, and it's finally crossed off the wedding 'to-do' list!

Mr. Hot Tea and I agreed to a few parameters when deciding where to spend our first married adventure together. As with any vacation, HT needs good surf and I require relaxation on a sunny beach. We briefly discussed the possibility of a dream destination - Maldives.


{ paradise perfected } / Image via Maldives Tourism

A fleeting thought, Maldives will remain on our bucket list for now. Maybe for an anniversary trip, a new destination of this magnitude would send my analytical brain into immediate overload. I'd want to research, plan, re-plan, and do even more research to make sure we made every moment count. I have no extra energy to DIY my diet, let alone coordinate the details required for such an extravagant trip. We will get there, just not this year.

So what did we decide? Simplicity and familiarity won out in the end. We are going to . . . CABO!


{ Look, Mom! It's the Arch } / personal photo

Now, you may be thinking what I did the first time HT took me to there. One photo will say it all.


{ Spring Break, Cabo style } / Image via Destination 360

Not exactly the fit for a mellow 30-something and a laid-back 40-something, right? I agree. And that's why we stay closer to the sleepy town of San Jose del Cabo and away from the livelier nightlife of Cabo San Lucas.


Online tourist map via Playa Grande Resort

It's the first time we're using our vacation club points (read timeshare), which was a pure exercise in logistics coordination. In the end, we will spend 7 nights at the luxurious all-inclusive Dreams Los Cabos Golf Resort and Spa. Ahhhh, doesn't that sound relaxing?

We can't wait for W-Day because it means we are that much closer to the honeymoon. Warm water, sunshine, and waves all day. Cabo will be the perfect escape from the dreaded fog monster. I have to say, that was easy!


Image via Staples

Where to you plan to spend your honeymoon? Will it be a new adventure or somewhere comfortably familiar for you and your beloved? And any tips for Cabo, our resort, or nearby day trips?


p.s. Anyone else want to admit to owning an 'easy' button?!


DIY Deets - Invites pt. 2: Pocketfold Assembly

I hope you're sufficiently rested from all that pocketfold prep. This next part will be more gratifying because you'll have a finished product to show for your work! Shall we get started?


Step 7: Host an invite-making party! 
For extra motivation, set up an afternoon where willing friends come over to lend their helping hands. I asked fellow Hive members, fully knowing that I'll be happy to reciprocate the favor. An incentive of homemade cupcakes and cookies sweetens the deal.


{ My invitation angels, BreezyBri19 and Miss Godiva }

Step 8: Affix ribbon to the folder.
I used clear photo mounting tabs on the top and bottom of the ribbon. Wrap the ribbon around the outside of the folder and stick the ends to the inside. One end will overlap the bottom edge where the pocket goes. The other end covers the top flap and comes down over the invitation panel crease.


Step 9: Mount pocket to the inside bottom panel of the folder.
Run double-sided adhesive down the three 0.5 inch tabs. Line up the corners and attach to the bottom edge of the folder. Press down to ensure a good seal, especially around the ribbon.


Step 10: Adhere the invitation to the inside center panel of the folder.
Run double-sided adhesive down the top and bottom of the invitation card's back side. Carefully line up the card in the center panel of the folder and press to make it official. 

Bonus Step: Round the corners.
This simple extra step transforms the original 12x12 paper into a finished pocketfold. Ta-da!


And that is how you make my semi-DIY pocketfold invitation! Still to come, RSVP and map cards and wraparound address labels for the envelopes.


If you've made it this far, thank you and congrats! My process is pretty involved and the results are totally worth it, I promise.

Sunday, August 28

DIY Deets - Invites pt.1: Pocketfold Prep

Aloooooooha, Hive! This little Teacup has been a busy bee. W-Day looms a handful of weeks away, inspiring a flurry of wedding-related preparation. Yay!


In the midst of bouncing around from project to project, I've neglected to keep you caught up on all our W-Day progress. No more - I've brewed a cup of my favorite hot green tea and put myself on DIY timeout to get back to writing. Blogging counts as wedding activity, right?!


I left off last week promising a detailed tutorial of our invites, post-reveal. Let's start at the very beginning. I hear it's a very good place to start. Thanks, Maria.


Image via Dvdizzy / Credit: "The Sound of Music," Dir. Robert Wise, 1965, film.


Step One: Source your invitation cards.
I chose to leave this first step to the professionals. After scouring the internet for inspiration, I ended up with 122 different designs saved to a folder on my computer and yet nothing felt quite right. It may be because our wedding didn't (and still doesn't) have a specific theme, so I had to dig deep to find the perfect cards. My new favorite designer is Vera Wang after registering for her china dinnerware. Luckily enough, she also has a line of invitations through William Arthur. Even better, the line is sold through Papyrus in the mall! 


Letting the invitation specialists do what they do best saved me untold levels of anxiety and stress. When there was a spelling error on the proof, it was their mistake to fix. I took advantage of a 20% off promotion and ordered them in March. One swipe of my credit card and the invitations were printed. A few weeks later I picked up the boxes, so much more lovely than I expected. Happy dance!


{ personal photos }


** WARNING! ** The next phase of my invite process is VERY time consuming. These steps are not meant to be finished in one sitting . . . impossible unless you're only making a handful. You will need a lot of free time to make them, and it helps to ask others to join in on the paper crafting fun so you maintain a happy attitude in the process. Make little batches in an hour here and there. Otherwise, you'll be up until 4am on the eve of your bachelorette weekend finishing them and wishing you had heeded more of your own advice!

Step 2: Gather supplies for pocketfold envelopes.
I decided to forgo envelope liners in favor of pocketfolds. Our wedding location will be a destination for many of our guests and they can keep all the info together in an easy to carry folder. Mrs. Deviled Egg's tutorial demonstrated how to make one from a piece of 12x12 cardstock and I referred to her post many times during this process. She also advises having a few months of time to make them before you need to send them in mail. Great tip!


My supplies: Broken down into two areas . . .consumables and hardware.

  • 12x12 cardstock, enough for 1 sheet per invitation. I spent several weeks waiting for paper to go on sale at Michaels and also purchased in bulk from scrapbook.com during a one-day sale. The paper I used was Bazzill Basics in Tiara, which retails for 69 cents per sheet. By waiting for the sales, my cost was approximately 40 cents each. Total cost = $56.00.
  • Ribbon. Instead of a belly band, I fastened a double ribbon around the outside of the pocketfold and secured it under the invitation card and pocket. Again, I used sales to defray the cost.
  • Photo mounting tabs, clear. I used two per invite to affix the ribbon to the pocketfold, 
  • Double-sided adhesive. This holds the invitation and pocket in place, very important to use a high quality brand so your hard work doesn't fall apart.

{ Hardware }
  • Paper trimmer
  • Scoring board and bone folder
  • Ruler
  • Adhesive tape gun
  • Round corner punch


Step 3: Start cutting!
Take all those 12x12 pages and trim them down to size. The first cut should be to the width of your invitations. Ours were 7.5 inches wide, so I modified Mrs. Deviled Egg's tutorial to work for our cards.


{ Mr. Hot Tea demonstrates proper cutting technique }

The next two cuts trim the pocket to size. This time, you want the length of the pocket to equal the width of your folder, plus one inch allowance for the tabs to affix the pocket to the folder. In our case, the length measured 8.5 inches. Then I trimmed the width down an inch so the titles of our RSVP, map, and reception cards would peek over the edge of the pocket.


{ We're a long way from this final look }

Step 3b: Take a break. Seriously. Go for a walk, catch a catnap, or pour yourself a drink. The next step may give you carpal tunnel syndrome - ask Mr. Hot Tea.


Step 4: Get your score on.
A scoring board and bone folder will earn their keep on this step. Start with the folder, and score twice. You'll want to use a sample invitation card for precise measurements. We scored ours at 2 inches and 7.5 inches. The center panel is where you'll affix the card. Fold along the score lines and use the bone folder to create a crisp crease.


Next up, score the pocket at 0.5 inches on the two short sides and on one long side. Using scissors, cut off the corners where the score lines intersect. This miter will allow the pocket tabs to cleanly fold without overlap. Fold along the score lines and use the bone folder to create a crisp crease.


* quick tips * Mark your scoring board for quick reference. Also, scoring on the outside (the pretty side) will result in less cracking of the paper when you fold it.


Step 4b: Break time! Mr. Hot Tea will demonstrate. Note the scored pockets by his side. If that's not unconditional love and support for his fiancee's crazy DIY projects, I don't know what is.


Step 5: Trim the ribbons.
Each ribbon measured 14.5 inches to cover the top flap and allow for overlap onto the invitation panel and the pocket panel. I chose sheer pink ribbon with a scalloped edge plus lilac satin ribbon for a pop of fun color. It also helped to attach the ribbons together pre-assembly for a smoother finish.


Step 6: Admire your pocketfold prep work! 


Oh yes, all that work for those three little pieces. Next up, assembly time . . .

What part of your invitation suite will you DIY? Any tips to add to the process I've outlined above to prep the pocketfolds?

Wednesday, August 24

I-Pic, You-Pic, We-Pic . . . E-Pics!

Warning - this post is pic heavy!


If you remember our proposal story, I shared Mr. Hot Tea's health scare with a benign tumor requiring a craniotomy and neurosurgery. The procedure was scheduled for January 2011 and it was highly likely that his facial nerve would be severed to remove the tumor, causing full paralysis on one side of his face. Rehab would take between 6 months to several years.


Why do I tell you all this? Because more than anything, Mr. Hot Tea wants his smile back for our wedding. Imagine losing function in half your face, eye bulging and lip sagging. Here's how it progressed.


{ Mr. Hot Tea about six months before we met }


{ On our first trip to Las Vegas, dating less than a month }


{ One day post-surgery }


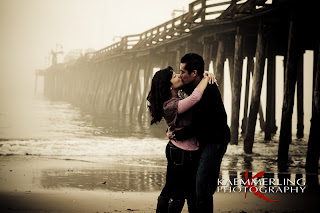
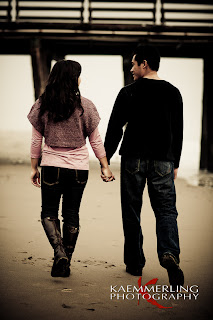
Mr. Hot Tea is a walking miracle - he rarely complains or voices a negative thought. So when he mentions something uncomfortable, I pay attention. That's how it went with our e-pics. It was important to capture "us" in the moment before looks would change and we wouldn't know if or when they would return. In the midst of the holiday rush, we found our photographer and booked engagement photos pre-surgery.


Kaemmerling Photography was our saving grace. Mr. Hot Tea remembered John Kaemmerling from high school had built a successful business since then. One look at his website and I was sold. We were willing to invest a significant portion of our wedding budget to photography and decided that only John would do. John is warm, friendly, and oh-so-talented! I'm grateful he was available for our wedding date.


He met us at the beach on the only foggy day during a week of sunshine - go figure. But the photos actually turned out better for it. We have the rights to the photo for our save-the-dates and the one we used for our Christmas card. We also ordered a DVD montage of our favorites, though not the easiest to reveal in a blog. Uh oh.


In becoming the Teacups, John graciously agreed to share some additional photos of our e-sesh with you. Are you ready?


All photos to follow are credited to Kaemmerling Photography.


{ Capitola Wharf }


{ This was our Christmas card }


{ This one is my personal favorite! }


{ We used to "Crossfit" in the pre-surgery days }


{ Hot Tea's shirt says Puropedo, no worries wear }


{ We gots skillz, the box is 3 feet high! }

The photos don't betray my emotions, but I was nervous! Sweat beaded up on my nose and I had fits of anxious giggles - so not cute. It took me a while to settle into being the focus of the camera (I prefer taking them to posing). This experience gave us a glimpse of what's in store for our big day and appreciate John's patience to calm me down and get me to relax.

Which one is your favorite? For your photos, did you get nervous? And any suggestions how to get over the candid camera nerves on W-Day?

Monday, August 22

The Teacup Invites Have Landed - Our Reveal!

My previous invite post was necessarily a tease, but no more! We've given our guests over a week to receive them and now it's your turn to see. I'll let the pictures do the talking. . .


{ The wrap-around labels are similar to those of our STDs, & I love the cake stamp! }


{ Oohh, lookee! What is that pop of color? }


{ DIY pocketfold out and turned around, ready to be opened }


{ Crappy iPhone photo, sorry }


{ Vera Wang "Embossed Lotus Scallop" invitations, printed by Papyrus }


{ RSVP response cards printed on Staples embossed cards, DIY style }

We asked our guests to "give advice, request a song, or draw a picture" on the blank side of the response card. I thought it would be a cute keepsake, and the success rate has been about 50/50.


Vera Wang "Embossed Lotus Scallop" reception cards, also printed by Papyrus }

The reception card gives you a better idea of the styling. I chose 2-color thermography since the cost wasn't much more than digital printing.


{ Front and back of the map card printed on pink parchment, DIY style }


{ Another look at the full suite }

I'll admit that I bit off a little more than I could chew with this wedding project. The DIY wraparound labels, pocketfolds, personalized RSVP cards, and maps took what felt like forever to print and assemble. Every spare moment for the better part of two weeks was spent by myself, with a few friends or Mr. Hot Tea late into the night -- or morning! -- on paper crafting. 

DIY-ing our invitations probably didn't save us any money and it definitely cost a lot of my time. I learned a lot of tips through trial and error and will share them in an upcoming tutorial. In the end, I can't tell you how relieved and proud I felt to get these finished!

 Will/did you DIY any part of your invites? How did you feel when you completed your project?  And what did you discover in the process?

Thursday, August 18

Shedding for the Wedding: Meet My New BFF

Before I tell you about me, let's talk about you. Hive, your outpouring of support and encouragement for my initial shedding posts overwhelmed me! I was nervous to share and you dispelled my fear. Your comments ran the spectrum of weight loss options, from quick fixes to long-term lifestyle change. Diet, exercise, how-to books and motivating pictures - oh my! Please accept my gratitude, I've read all the feedback twice over and it means a lot to have you there on my journey. From the bottom of my teacup heart, thank you!


Image via The Tea Cosy

When we last left off, I was debating the merits of Weight Watchers vs. Jenny Craig. WW received the vast majority of positive feedback and I agree wholeheartedly with the concepts they teach. Based on my needs and lifestyle, I chose the road less traveled. Allow me to introduce my new BFF, Jenny!


{ She's really real! } / Image via Jenny Craig

I made an appointment for the very next morning after deciding it was time for a change. My first impression of the center was warm and welcoming, such a relief! I was really afraid to be brushed off for wanting help or told that my goal wasn't enough weight loss to enroll in the program. Instead, the sales consultant empathized and shared her similar experience. As a salesperson myself, I appreciate someone savvy in the craft. I'm also the biggest sucker for a pitch that delivers what I'm looking for. So guess what happened?


The free session walked through the founding principles of the program and how I would be supported in body, mind and food. Best of all, the approach was to start and then wean off their branded meals. Portion control, burning more calories than ingested, and upping activity level - I can do that!


If you're thinking what I'm thinking, my first and only question was cost. Let's face it, I'm a soon-to-be bride with little disposable income. And we all know . . .


Image via cafe press

The JC route is not for those faint of budget, for sure. The enrollment fee and weekly food cost set me back a few hundred dollars. Ouch! I'll be honest - I drove away with a hint of buyer's remorse. What was I thinking?!


After I got home, the feelings settled and I got to work cleaning out our fridge. Transformation complete, our freezer filled up quickly with the JC meals.


 { Anyone else love Trader Joe's? } / personal photo

I know, weirdness to see all that boxed frozen food as my nourishment augmented with fresh fruit, veggies, yogurt and juice. How did it come down to this? Curiosity won out and I prepared my first meal.


{ Breakfast hot pocket, yogurt & juice } / personal photo

Mr. Hot Tea saw my tiny plate of food and said, "THAT'S IT?" Yes, dear. That's it. And so my new relationship with food begins. Let's just pray I don't turn into a ravenous mess!


Image via lolcats


How do you cope with a major lifestyle change? Are you fearful or hopeful? Or both?!  What have you done to prepare yourself to successfully achieve your goal?